Parallels Blog Award-winning solution to run Windows on Mac. Our blog provides helpful tips and tricks surrounding virtualization, macOS, and Windows. 2024-09-12T17:38:53Z https://www.parallels.com/blogs/feed/atom/ WordPress Ary Collet Junior <![CDATA[How to zoom in and zoom out on Mac]]> https://www.parallels.com/blogs/?p=43054 2024-09-12T17:38:53Z 2024-09-16T13:00:00Z While many users tout the Mac and macOS’s simple and refined UI, there’s a downside to its stripped-down design style.   Though users know not to expect labyrinthian file structures and endless settings, […]

The post How to zoom in and zoom out on Mac appeared first on Parallels Blog.

]]>
While many users tout the Mac and macOS’s simple and refined UI, there’s a downside to its stripped-down design style.  

Though users know not to expect labyrinthian file structures and endless settings, they often need clarification on Macs can and can’t do. 

As such, many need help learning handy features, like how to zoom in on Mac and how to zoom out. This part is especially difficult for new users and those with accessibility needs. Ironically, Mac’s accessibility settings could be more accessible. 

In this write-up, I’ll walk you through various methods you can use to zoom in and zoom out on your Mac, plus explain how to check your Mac’s resolution. 

Parallels Desktop allows your Mac to run Windows, helping you run many Windows-exclusive games and applications. Download a free trial of Parallels Desktop 

How to zoom in on Mac and how to zoom out 

Screen size may be one setting among hundreds, but the sizing and spacing of on-screen elements can dramatically improve your user experience. 

How to zoom out on Mac with keyboard shortcuts 

Keyboard shortcuts may be old-school but making hotkeys for zooming in and zooming out on Mac can save you a lot of time. 

First, though, you must flip a switch in System Settings

How to zoom on mac

1. Hover your cursor to the top left corner of your screen, then click the Apple symbol 

2. Select System Settings

3. Find Accessibility on the sidebar, click it 

4. Hit Zoom 

5. Turn on the setting labeledUse keyboard shortcuts to zoom” 

Now that you’ve enabled zoom shortcuts, you can use these three by pressing down each key at the same time: 

Zoom in on mac

1. Zoom in: Hold Option(⌥). Command(⌘), and Equal(=) 

2. Zoom Out: Hold down Option(⌥), Command(⌘), and Minus(-) 

3. Switch between Zoom in and Zoom out: Hold down Option(⌥), Command(⌘), and Eight(8) 

However, these commands don’t work within most applications and browsers. In such cases, use these key combinations: 

  • Zoom In: Command(⌘) and Plus (+) to 
  • Zoom Out: Command(⌘) and Minus (-) 

Now you know how to zoom out on Mac with the flick of a switch. 

How to zoom in on Mac—and out—with your trackpad 

Apple’s trackpad sports a broad surface area and multi-finger recognition, allowing snappy and intuitive screen control. Zooming in on Mac is as simple as a pinch. 

Of course, you’ll need to adjust MacOS settings to use it. 

1. Click the Apple icon on the top left corner of your screen—in the menu bar 

2. Click System Settings 

3. Click Accessibility  

4. In the Accessibility window, click Zoom

Zooming on Mac

5. Enable Use trackpad gestures to zoom 

Zoom out on a Mac

How to zoom out on Mac—and in—with scrolling 

How can you zoom in and out on Mac using your mouse’s scroll wheel or your trackpad’s gestures?  

It’s easy, but first, I’ll need to enable some accessibility settings.  

1. Hit the Apple taskbar icon once more and select System Settings 

2. In the side menu, click Accessibility 

3. Scroll down Accessibly Settings and click Zoom 

4. Enable Use scroll gesture with modifier keys to zoom 

Now, simply hold your chosen modifier and scroll away (e.g., up to zoom in, down to zoom out). 

How to get in and out of full-screen view on your Mac 

Mac’s Full Screen View lets you pull an application window into a separate screen, dedicating every square inch to a single application or window. 

There is no need to drag, minimize, or maximize windows, and there is no distracting app drawer, either. Simply use a swipe gesture or key combination to return to your original desktop sans the now-full-screen app. 

There are a few ways to access full-screen mode. 

1. Turn full-screen mode on with each window’s green button 

This one only takes a click. Hover your mouse over the top left corner of whatever window you want to expand and click the green button. 

Exit Full-Screen mode by clicking the same button. 

And you’re done! 

2. How to access full-screen mode via View Menu 

You’ll spot the View drop-down menu on your taskbar in most applications. 

Zoom in and out on Mac

All you need to do is click View, then Enter Full Screen

Exit by clicking View again. Now select Exit Full Screen

How to access full-screen mode via shortcuts 

Keyboard shortcut warriors also have a shortcut they can use. 

  • Control(⌃) Command(⌘) 

Press ESC to exit your Mac’s full-screen mode. 

Side-by-side full-screen mode 

What if you like the improved focus of full-screen mode but don’t want to swipe back and forth between desktop views? 

Tiling windows lets you view two windows side-by-side within one full-screen view. 

You can access it by hovering your pointer over the green button on your window bar—or pressing the button and holding it down. A menu will pop up with these three options. 

Once you select one side, MacOS will fill the blank side with all your open windows. Click the desired window to have it occupy the other half of the screen. 

Zoom in and out on Mac

I love this feature. A writer like me can read web research in one half and write in a text editor on the other. Now, I have more time for quality research. 

How to check your Mac’s screen resolution (and how to change it) 

Your screen’s resolution determines the size and spacing of almost every on-screen element.  

I’ll access resolution settings by clicking the Apple taskbar menu and selecting System Preferences. Scroll down to the Displays tab and enable the Scaled resolution setting. 

The Displays window lets you select between a few size options with your current resolution highlighted. If you’d like to zoom out or zoom in, click each resolution setting to find your ideal visibility-to-screen space ratio. 

Zoom in and out on Mac

Macs do a lot more than you think 

It’s easy to forget that Mac’s simplicity hides a wide range of features, many of which can transform the user experience by making things simpler, easier, and more accessible. 

Zooming in and out is a perfect example. Enlarging text and visuals might make you feel old, but its benefits vastly outweigh any age shame.  

Parallels Desktop allows your Mac to run Windows and so much more, helping you run many Windows-exclusive games and applications. Try it today

The post How to zoom in and zoom out on Mac appeared first on Parallels Blog.

]]>
Ary Collet Junior <![CDATA[What’s new in Parallels Desktop 20 for Mac]]> https://www.parallels.com/blogs/?p=43021 2024-09-10T13:58:04Z 2024-09-10T13:00:50Z I’m thrilled to announce the release of Parallels Desktop 20 for Mac – the latest and greatest version of our product!   The biggest highlight is the new Parallels AI package, […]

The post What’s new in Parallels Desktop 20 for Mac appeared first on Parallels Blog.

]]>
I’m thrilled to announce the release of Parallels Desktop 20 for Mac – the latest and greatest version of our product!  

The biggest highlight is the new Parallels AI package, offering secure, downloadable pre-packaged virtual machines to quickly enhance AI developing skills in an offline environment.  

Parallels Desktop 20 is also ready for macOS Sequoia and Windows 11 24H2 and introduces a new Management Portal as a part of the new Enterprise Edition. It offers numerous updates for Windows, macOS and Linux VMs.  

Try Parallels Desktop 20 for Mac now – it is better than ever.  

PS. Read all the way to the end for a fun Easter egg!  

Ready for macOS Sequoia 15 

The new Parallels Desktop 20 for Mac supports the upcoming macOS Sequoia (when released), improves the application stability on this operating system, and allows Mac users to enjoy AI-powered Writing Tools with Windows apps (requires macOS Sequoia 15.1).  

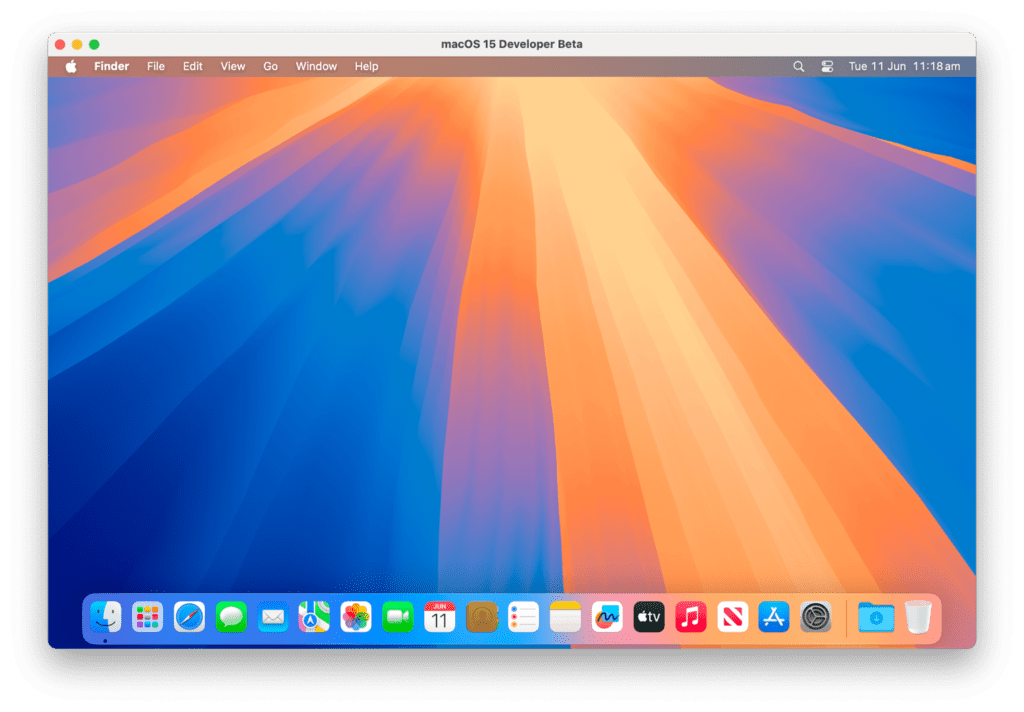
Preview macOS Sequoia 15 using Parallels Desktop. 

This version decreases the use of deprecated APIs for content capture (such as CGDisplayStream and CGWindowListCreateImage), which now trigger system alerts that indicate they might be able to collect detailed information about the user. Instead, it moves to the recommended macOS API to ensure security and compliance. 

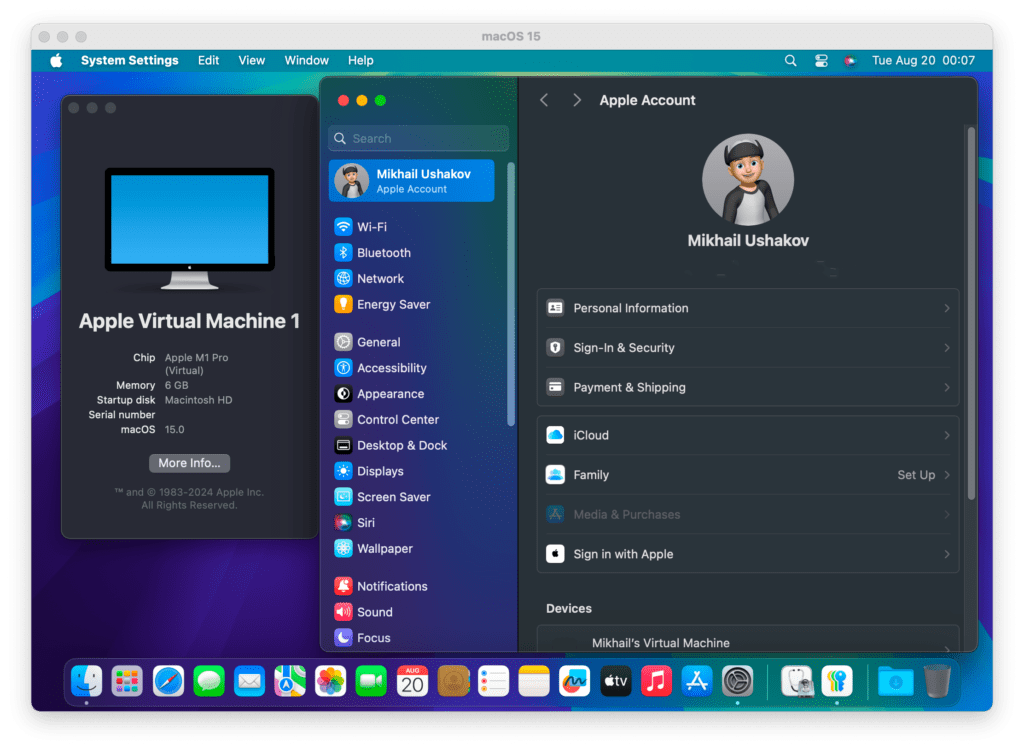
In addition, macOS Sequoia provides the ability to sign in to Apple ID in macOS virtual machines on Apple silicon!  

This long-awaited improvement allows developers to fully leverage macOS virtual machines for building and testing software in an isolated environment.  

apple account mac vm screenshot

With Parallels Desktop for Mac, it is so easy to install a new macOS virtual machine on Apple silicon.  

Ready for Windows 11 24H2 

Improving the stability and integration of this major Windows 11 update in a virtual environment has been a major goal since Windows 11 24H2 appeared in the Canary channel in early 2024. 

These efforts include fixes for the NVMe driver, express Windows 11 installation on Intel-based Mac computers, mouse cursor positioning, and a fix for the dynamic resolution to sustain the ability to resize a Windows 11 VM window with automatic resolution adjustments.  

From the Microsoft side, optimizations for the new major Windows 11 version 24H2 ensure users’ workflows remain uninterrupted while running legacy Windows apps (built for the Intel platform) and get up to 80% performance boost[1] for certain computational workloads thanks to the improved Prism emulator built into Windows 11 on Arm OS.  

State of Windows apps on Apple silicon Macs 

Contrary to popular belief, most Windows apps run just fine in Windows 11 on Arm – the version of Windows OS users run on a Mac with Apple silicon.  

With the increased adoption of Apple silicon, Parallels Desktop became an essential tool for many professionals who need access to the Windows OS ecosystem – our customers happily run more than 200,000 Windows apps on their computers. 

Parallels is proud to be the first Microsoft-authorized solution for running Arm versions of Windows 11 on Mac, helping to amplify the adoption of the Arm platform by software developers.  

The latest release offers improved compatibility with ArcGIS Pro, LabVIEW, Ninja Trader, and other applications so you can now seamlessly install and run on a Mac with Apple silicon—all with the help of Parallels Desktop for Mac.  

It’s also great to see software companies shift their strategy and start delivering product updates that run natively in Windows 11 on Arm which means more apps will soon become available for Apple silicon users. Recent examples include Malwarebytes ThreatDown, Opera browser, Adobe Illustrator, LibreOffice, and others. 

Streamline your development workflow 

The Parallels Desktop 20 release reflects our ongoing commitment to delivering the best environment for developers to build, automate, and test solutions on every major operating system (Windows, Linux, and macOS).  

Let’s start with the Visual Studio Code extension for Parallels Desktop. This tool allows you to create and manage your Parallels Desktop virtual machines from a single user interface — and it’s becoming a popular choice, with over 50,000 downloads and counting.  

  • This release introduces the ability to control virtual machines using natural language with Microsoft Copilot integrated into the Parallels Visual Studio Code extension.   
  • DevOps and developers can use Parallels Desktop GitHub Actions to transform their CI/CD workflows, automating the deployment and management of virtual machines directly from their GitHub repository. Imagine triggering VM provisioning, testing, and configuration automatically as part of your GitHub Actions pipeline, eliminating manual steps, reducing errors, and accelerating your development process.  
  • Enjoy the convenience of the Parallels Desktop DevOps Service to manage and orchestrate multiple Parallels Desktop hosts and virtual machines. Built to cater to the unique needs of DevOps teams, developers, and IT administrators, this service offers robust tools and automation capabilities that simplify the management of complex environments, enabling you to accelerate your software delivery process. 
  • Perhaps the most exciting feature of this release is the introduction of the Parallels AI Package, now available in the extension catalog. These allow developers to start working and experimenting with AI at a low cost, with quick onboarding, and the ability to test on different configurations, including those without network access. Interested? Read more about AI VMs

You can also join our Discord server to ask questions, share your experience, and get help from the community. 

If you’re interested in macOS virtual machines…  

For developers and DevOps who run macOS virtual machines on a Mac with Apple silicon, the new version delivers:  

  • New! The ability to use snapshots to quickly save and restore the system state for an even more flexible development and testing process.  
  • An improved Parallels Packer plugin for a faster macOS VM installation in express mode, automating the initial setup process using Apple Vision framework (OCR).  
  • An enhanced Parallels executor for GitLab runner that now allows the use of macOS VMs on Apple silicon Mac computers.  

Improvements for Linux fans 

The Parallels Desktop team has listened to your feedback about the issues when running the newly released kernels inside Parallels Desktop virtual machines.  

It’s well-known that the newest Linux kernels can sometimes be unstable and lead to compatibility challenges. However, we didn’t just acknowledge the issue — we took the first step to solve it. 

Through careful analysis, the team discovered that nearly 50% of the reported issues were related to the Shared Folder driver operating within the kernel space.  

Tackling this required adopting the high-level FUSE API, which should significantly reduce installation issues caused by kernel API changes in the near future.  

This enhancement is designed to improve compatibility and ensure seamless support for future Linux distributions, reaffirming our commitment to providing you with a reliable and consistent virtualization experience. 

This change also allowed us to improve performance for certain operations. You will feel the speed improvements when working with the volumes shared from Mac — now up to 4x faster than before[2].  

Introducing Management Portal and Parallels Desktop Enterprise Edition — coming later this fall 

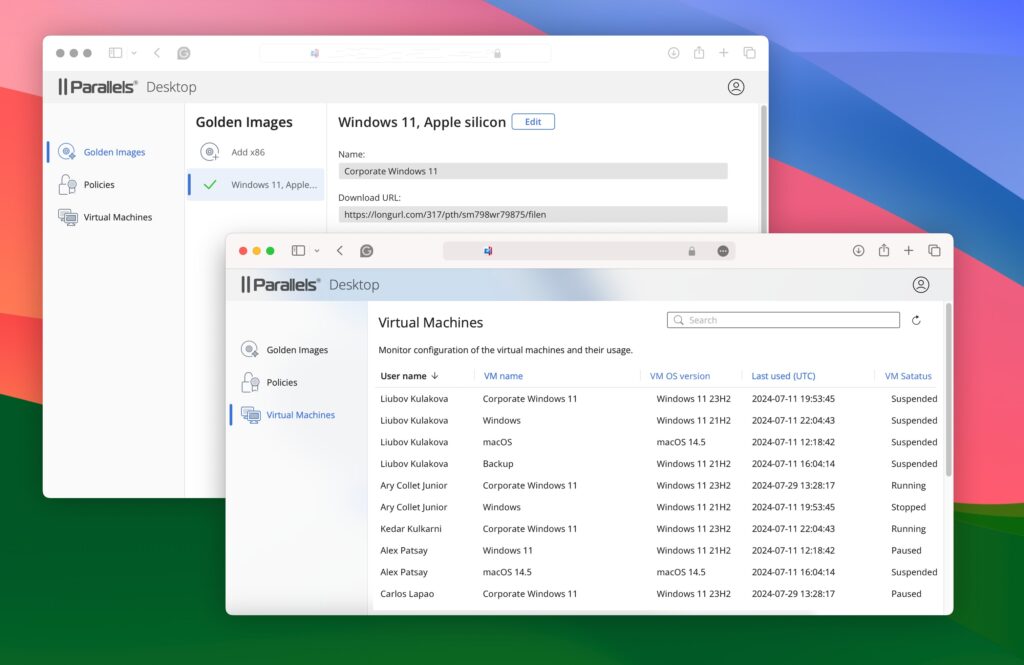
I’m excited to announce a significant update that transforms how IT administrators manage Parallels Desktop virtual machines across their organizations. 

The changes are based on user feedback, particularly how IT administrators have expressed the need for more advanced tools to manage their Parallels Desktop environments.  

Common requests included the ability to control virtual machines remotely from a single interface, centralized monitoring of VM performance across the entire organization, and a more convenient way to deploy the virtual machines to endpoint Macs.  

The Parallels Desktop team has taken this feedback to heart and are thrilled to introduce the Management Portal, which addresses these needs head-on.  

parallels desktop virtual machine multiple windows screenshot

To complement the release of the Management Portal, the Parallels Desktop Enterprise Edition is now available—it’s our most advanced offering yet.  

Created for organizations that need more control, visibility, and efficiency in managing their large-scale virtual environments, the new Edition unlocks access to the new Management Portal. 

And that’s just the beginning. The Enterprise Edition is packed with enhancements that will empower your IT team to operate more effectively and efficiently than ever before. 

Stay tuned for further updates! If you’re eager to be among the first to experience these new capabilities, reach out to our sales team today for more details and to arrange an exclusive demo: https://www.parallels.com/products/desktop/enterprise/.  

Streamline the deployment process  

In the world of IT management, seamless software deployment is crucial.  

However, some IT admins using Parallels Desktop have recently faced a challenging roadblock when deploying the application through some Mobile Device Management (MDM) providers.  

The issue stemmed from the bundle structure of the deployment package, which, while powerful, was not widely supported by many MDM providers, e.g., Microsoft Intune.  

As a result, admins were forced to find workarounds, such as deploying the software via custom scripts. Additionally, our customers reported the package can’t be run on Mac computers with macOS Sequoia.   

The latest release introduces support for converting the existing bundle package into a flat package format, which is compatible with most MDM providers.  

This simple yet powerful change ensures that IT admins can now deploy Parallels Desktop without resorting to complex scripts.  

The flat package format maintains all the essential capabilities of the original bundle, including the ability to pass a license, configure policies, and deploy VMs with precision.   

For MDMs with file size limitations, admins can now link a cloud-stored VM in the package, streamlining large deployments. The option to include the VM file in the package remains available.  

To further enhance the deployment experience, Parallels has added the ability to always deploy the latest version of the Parallels Desktop application without needing to bundle the DMG file with each package.  

This ensures that IT admins can use the time they used to spend on building a new package on other crucial tasks.  

These advancements mark a significant milestone in our ongoing commitment to improving the IT admin experience. With these new features, deploying Parallels Desktop across a network of Macs is simpler and more flexible than ever before.  

Can’t wait? You can give it a try now: https://www.parallels.com/products/business/download/

Parallels Desktop 20: The latest in a long line of innovations 

Many years ago, a small group of enthusiasts embarked on a journey to create a product that, year after year, captured the hearts of more and more users worldwide: be it a Windows lover, a student, a developer, or an IT admin – Parallels is proud to serve so many different people worldwide.  

Fun fact: Parallels Desktop launched publicly in June 2006 with version 2.5, which makes this release not an anniversary by age but rather yet another round number release. Stay tuned for anniversary easter eggs in 2026 😊

Years later, Parallels Desktop became the leading solution for running Windows, Linux, and even macOS in a virtual environment – the only solution authorized by Microsoft to run Windows 11 on a Mac with Apple silicon! 

And this is only the beginning. Look for more enhancements in the near future, making deployment and management an even smoother process for IT admins worldwide. Stay tuned for what’s next!  

New to Parallels Desktop for Mac? Get your14-day free trialof Parallels Desktop 20.0.0 now.   

  • [1] – Performance measurements conducted by Parallels by comparing the score produced by the x86 version of the test Floating Point Math from the Passmark 10 CPU Mark suite in Windows 23H2 (10.0.22621.3593) versus Windows 24H2 (10.0.26120.670) on MacBook Pro (M2 Max, (8+4) CPU, 96GiB RAM) with the virtual machine (4 CPU, 32GiB RAM). Measured using Parallels Desktop public version 19.4.1. The performance may vary based on usage, system configuration, and other factors. 
  • [2] – Performance measurements conducted by Parallels by measuring the time it takes to copy 3000 (three thousand) files in 315 directories from the primary macOS 13.3 (22E252) to the Ubuntu Linux virtual machine (4 CPU, 8GiB RAM, Ubuntu Server 22.04) on MacBook Air (M2, (4+4) CPU, 32GiB RAM). Measured with a prerelease version of Parallels Desktop 20 versus the released version of Parallels Desktop 19. The performance may vary based on usage, system configuration, and other factors. 

The post What’s new in Parallels Desktop 20 for Mac appeared first on Parallels Blog.

]]>
Ary Collet Junior <![CDATA[How to find and delete duplicate files on your Mac]]> https://www.parallels.com/blogs/?p=43029 2024-09-04T16:07:22Z 2024-09-04T15:00:14Z From priceless photos and important documents to music files and videos, duplicate files are commonly found on most computers. That said, they take up valuable storage space and make […]

The post How to find and delete duplicate files on your Mac appeared first on Parallels Blog.

]]>
From priceless photos and important documents to music files and videos, duplicate files are commonly found on most computers. That said, they take up valuable storage space and make it harder to find what you need.  

This article is a step-by-step guide to find and remove duplicate files, a vital hygiene practice for maintaining an organized, efficient, and smooth-running workspace.  

Explore Parallels Toolbox (included in your Parallels Desktop subscription) to learn how to dedupe files and free up your hard drive in mere minutes. 

How to find and remove duplicate files on a Mac 

Users can open Parallels Desktop on a Mac to find and remove duplicate files with the built-in “Find Duplicates” tool.   

If you’re using Parallels Toolbox, here’s how to find and remove duplicates on a Mac.  
 

1. Open Parallels Toolbox 

2. Locate and launch the “Find Duplicates” tool within Parallels Toolbox 

3. Choose the folders or drives that may contain duplicates—you can even scan multiple locations simultaneously 

4. Initiate the scanning process; the tool will search for duplicate files across your selected locations 

5. Once the scan is complete, you’ll receive a list of duplicate files—the results are typically organized by file type, making reviewing a whole lot easier 

6. Review the duplicates carefully; the tool lets you preview files before deletion to ensure you don’t remove important content 

7. Select the duplicate files you want to remove; Parallels Toolbox offers “smart” selection options to help you choose which duplicates to delete 

8. After selection, remove the duplicates using the “Move to Trash” option—it’s that easy 

To mitigate lengthy processing time, consider scanning multiple smaller sections of your drive rather than tackling the entire system simultaneously. 

Does Apple have a duplicate file finder? 

MacOS does not have a built-in duplicate file finder. If you can believe it, that’s one thing Apple has not developed!  

Because of this, users must rely on manual methods (ack!) or a trusted third-party application like Parallels Desktop to identify and remove duplicate files.  

Finder’s Smart Folders provide a powerful tool for those who prefer a more hands-on approach.  

Finder’s Smart Folders create dynamic folders that display files based on specific search criteria, giving users full control over their file management.   

Users can manually sift through potential duplicates by setting parameters such as file type, date created, or file size.   

However, this process can be tedious and may only catch some things, especially if files have slightly different names or formats. 

Is it safe to delete duplicate files on Mac? 

Yes, it is safe to delete duplicate files on your Mac if you need storage space. Be sure to follow a few basic guidelines so you don’t find yourself in a pickle.  

Here are examples of files safe to delete on Mac. 

  1. User-generated files are safe to delete. Any file you create or download can be safely removed if it is duplicated on your drive. 
  1. Duplicate system files are usually safe to remove, but it’s best to avoid deleting them until you’re confident you don’t need them. If you inadvertently delete a file that macOS needs to run, that could cause unwanted issues—and require IT assistance! 
  1. Always take a quick look at your files before deleting them. Even when using automated tools, it’s prudent to double-check files to ensure you’re not removing anything important. 
  1. Back up your hard drive before performing bulk deletions. This step will ensure you can recover any accidentally deleted files—better safe than sorry! 
  1. We can’t stress this enough: if you’re unsure about a file’s purpose, it’s better to leave it alone. 

The long and short of it is that you can optimize your hard drive by deleting duplicate files, but it really is best practice to use a reputable tool like Parallels when you do it.  

And don’t skip reviewing your files before deleting them!  

This step will help ensure you don’t accidentally remove critical data and have to spend hours trying to recreate all of it (although the Find Duplicates tool does include a “restore” option in some cases). 

How to find and remove duplicate files on Windows 10 

The simplest way to identify (and remove) duplicate content on Windows 10 is to use the built-in features or third-party software like Parallels.  

If you choose to brave the built-in Windows features, here are some things to try: 

  1. File Explorer: Use the search function and sorting options to identify duplicates manually. (This can be grueling depending on how long you’ve owned your computer and how many files and folders you have on your hard drive). 
  1. Windows PowerShell: Use commands to find and delete duplicate files automatically. (This can also be tricky if you use different naming conventions on your dupes.) 
  1. Or you can use Parallels Toolbox, which has a tool that is specifically designed to remove duplicate files.  

The Find Duplicates feature inside Parallels Toolbox can be used on Mac and Windows to search and delete duplicate files without hassle.  

This Parallels feature automatically searches every drive and folder to quickly identify the identical file taking up your disk space and delete it. Other software may not find identical files named differently, but Parallels will! 

To start using the Parallels Toolbox to find duplicates, just: 

  1. Download Parallels Toolbox.  
  1. Double-click on the downloaded image file to start the installation process. 
  1. Open the tools by clicking on the app from the Applications folder. 
  1. Click on Find Duplicates to begin searching for duplicate files. 

If you’re visually oriented, watch this video to see Parallels Toolbox in action. 

Does Microsoft have a duplicate file finder? 

Microsoft does not provide a built-in duplicate file finder specifically for Windows 10.  

Users typically need to rely on third-party applications (like Parallels!) to locate and remove duplicate files effectively. While Windows Explorer and PowerShell can identify duplicates manually, they do not offer a dedicated tool. 

No more duplicate files: A happy ending 

Everyone’s a fan of happy endings and choosing Parallels Toolbox to remove duplicate files is a good decision for several reasons.  

Parallels Toolbox offers a comprehensive suite of over 50 tools designed to enhance your computer’s performance by efficiently managing storage space.  

The “Find Duplicates” tool is quite powerful and enables users to trash redundant files that clutter the system, saving valuable disk space and helping speed up your Mac and improve overall system performance.  

Additionally, this feature is simple to use and provides a straightforward interface that makes locating and deleting duplicates easy—even for non-tech-savvy users.  

Finally, Parallels Toolbox integrates with Mac and Windows systems and supports many file types, making it a flexible and trusty tool for maintaining a clean and efficient digital workspace. 

Try Parallels Toolbox for free (plus, it is included in Parallels Desktop subscriptions) and discover why millions of users trust Parallels to optimize the way they work. 

The post How to find and delete duplicate files on your Mac appeared first on Parallels Blog.

]]>
Kelsey Jensen <![CDATA[Unleash your inner demon slayer: Playing Diablo on a Mac with Parallels Desktop]]> https://www.parallels.com/blogs/?p=42665 2024-07-02T13:42:28Z 2024-07-01T13:00:00Z Are you a Mac devotee who’s been longing to experience the dark and wicked world of Blizzard Entertainment’s Diablo?   Well, I’ve got some great […]

The post Unleash your inner demon slayer: Playing Diablo on a Mac with Parallels Desktop appeared first on Parallels Blog.

]]>
Are you a Mac devotee who’s been longing to experience the dark and wicked world of Blizzard Entertainment’s Diablo?  

Well, I’ve got some great news for you — Parallels Desktop makes it easy for you to explore Sanctuary on your beloved Mac.  

No longer do you have to be limited by compatibility issues; instead, get ready to join the countless PC gamers in this action-packed adventure that they can’t stop talking about.  

I’ll guide you every step of the way to use Parallels Desktop so that your venture into Diablo is triumphant. 

Smoother graphics and faster performance are guaranteed as this extraordinary program ensures that nothing stands in between you and your epic adventures! 

Ready to transform your Mac into a gaming powerhouse? Get Parallels Desktop for Mac Pro Edition now and unleash your inner demon slayer! 

How to play Diablo on a Mac 

Ready to save Sanctuary? With Parallels Desktop Pro, you can quickly and easily install Diablo onto your Mac. Here’s how.  

1. Purchase and install Parallels Desktop Pro 

Get started by heading over to the official website and grabbing a copy of Parallels Desktop for Mac Pro Edition. Download it and get to installing.  

2. Install Windows on your Mac 

Open Parallels Desktop for Mac Pro Edition, click through instructions, then grab a valid Windows license key or installation media to finish things off.  

3. Adjust the virtual machine settings 

Once you’ve installed Windows, head into the Parallels Desktop Control Center under “Hardware” to allocate sufficient RAM, CPU, and GPU resources to ensure smooth gameplay. 

screenshot: adjusting virtual machine settings to allocate sufficient RAM

4. Optimize Parallels Desktop for gaming 

In the Control Center, select “Preferences” and choose the “Optimization” tab. Enable “Optimize for games” to further enhance your Diablo gaming experience. 

screenshot: optimizing parallels desktop for gaming

5. Install Diablo  

Now get your hands on the BattleNet client from Blizzard Entertainment’s website.  

Follow some more instructions on-screen until you’ve downloaded and installed Diablo within your virtual machine environment 

6. Configure game settings 

Launch Diablo within your Windows virtual machine and head to the in-game settings menu.  

Adjust the video and audio settings to your preferences and ensure that the game is running how you like.  

7. Start playing Diablo on your Mac 

You’re now ready to slay evil forces with ultimate precision using your favorite operating system.  

Can Diablo 2: Resurrected be played on a Mac? 

Diablo 2: Resurrected, similar to Diablo 3, is not natively compatible with Mac.  

Simply follow the steps outlined in the section above to play the game on a Mac. You can also use these steps to play Diablo Immortal. You’ll be slaying monsters in no time! 

Play Diablo on Mac with Parallels Desktop 

Gearing up for an epic journey into Diablo or the vast world of PC gaming?  

Parallels Desktop offers Mac users a powerful and versatile virtualization solution without compromising performance or user experience.  

No more rebooting, no need to own multiple devices – this top-tier software ensures that graphics and gameplay remain smooth while you explore your favorite games.  

So, if you’re ready to set out on a captivating adventure, equip yourself with the best tool available — Parallels Desktop — and get ready for full immersion! 

Ready to transform your Mac into a gaming powerhouse? Get Parallels Desktop for Mac Pro Edition now and unleash your inner demon slayer! 

The post Unleash your inner demon slayer: Playing Diablo on a Mac with Parallels Desktop appeared first on Parallels Blog.

]]>
Mikhail Ushakov <![CDATA[Introducing Parallels Desktop 19.4.0!]]> https://www.parallels.com/blogs/?p=42651 2024-06-25T14:41:06Z 2024-06-25T14:41:02Z Hello, Parallels Desktop community!  I’m thrilled to announce the release of our latest Parallels Desktop update, 19.4.0. It offers improvements and fixes based on your valuable feedback.   Our Product and Engineering teams have been closely monitoring […]

The post Introducing Parallels Desktop 19.4.0! appeared first on Parallels Blog.

]]>
Hello, Parallels Desktop community! 

I’m thrilled to announce the release of our latest Parallels Desktop update, 19.4.0. It offers improvements and fixes based on your valuable feedback.  

Our Product and Engineering teams have been closely monitoring your needs and working hard to ensure Parallels Desktop continues to deliver a seamless and powerful experience.  

See what’s new in this 19.4.0 update

Enhanced compatibility with Windows apps on Apple silicon Macs 

Compatibility with NinjaTrader, Mathematica, and other apps 

We’ve received numerous requests from customers facing issues with apps that can’t properly work with network folders.  

For example, the NinjaTrader app would not start by default if you had enabled “Mirror Mac and Windows user folders” feature in the virtual machine’s configuration.  

We’ve reworked how Mac user folders (Documents, Desktop, Downloads, Music, Pictures, and Movies) are presented in Windows to address this issue. 

Previously, Mac folders were available in Windows via a network share. For example, the NinjaTrader app would not start when installed from a network location in Windows. Other Windows apps may have errors when saving project files to a network location.  

We’ve implemented a new approach using symbolic links in Parallels Desktop 19.4.0.  

These symbolic links act like pointers that direct Windows applications to the actual location of your Mac’s shared folders while still appearing to be located on the local Windows C drive.  

This new approach allows Windows applications to work with Mac user folders the same way as they do with native Windows folders, without encountering compatibility issues. 

If you’re interested in running NinjaTrader, Mathematica, or other apps that didn’t work before, give them a try and share your feedback with us in our forums or in the comments of this post! 

Compatibility with LabVIEW 

Some of you have encountered serious issues installing LabVIEW in Windows 11 on Arm, particularly experiencing the crash (BSOD) after restarting Windows.  

Our research indicated that this issue stemmed from Windows drivers compatibility issues between Intel x86_64 and Arm architectures. This compatibility problem prevented the OS from loading correctly and resulting in the dreaded BSOD. 

Although we can’t modify the LabVIEW app directly, we have discovered that the underlying problem stems from the app loading its x86 drivers prior to the Windows drivers. This sequence disrupts the proper loading of Windows.  

We previously released a KB article that provides a workaround, but customers have still reported challenges, resulting in roadblocks when working with LabVIEW in Windows 11 on Arm. 

 In response, we’ve implemented a fix to resolve this issue, ensuring that Windows will no longer boot into BSOD after a restart. For more details, refer to our updated KB article

Running Microsoft SQL Server on Apple Silicon 

Many customers, including students and developers, have requested the ability to run Microsoft SQL Server in Windows 11 on a Mac with Apple silicon, while the MS SQL Server is not fully compatible with Windows on Arm today.  

The use cases are different. Examples include:  

1. Developers who need to have an SQL database for application development, which is convenient because Visual Studio and Visual Studio Code work well in Windows 11 on Arm. 

2. Students who want to work with SQL Server and connect to it from SQL Management Studio — which also works well in Windows 11.  

3. People who want to install certain Windows software that requires an SQL database.  

Given the current compatibility challenges, we’ve explored various solutions and are excited to introduce a new approach. 

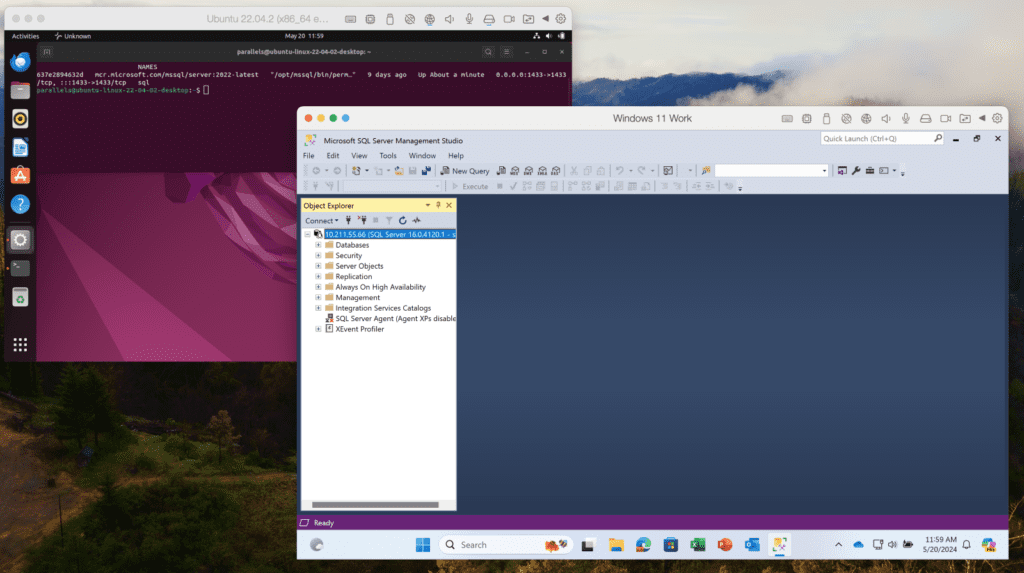
In the past, we used to offer our customers various solutions, but those didn’t work for many users. Today, we believe that one of the most useful solutions would be to create an Ubuntu VM with x86_64 emulation and a preinstalled Docker engine.  

This setup allows you to get Microsoft SQL Server running with a single command, making it easy to connect from Visual Studio, VS Code, or SQL Server Management Studio within your Windows VM. Detailed instructions can be found in our KB article.  

This update will guide you through this process if you attempt to install SQL Server 2019/2022 in a Windows VM. 

install SQL Server 2019/2022 in a Windows VM screenshot example 

Improved integration with macOS 

Many users enjoy using macOS Spotlight to search for applications. However, some have found it confusing when similar app names appear for their Mac and Windows/Linux apps.  

To address this issue, we’ve added OS badge icons to the medium-sized icons of shared apps in Spotlight. This visual cue will help you quickly identify which OS the app belongs to without affecting your Dock icons. 

os badge icons example

Command line utility improvements (only Pro and Business Editions) 

We love our developer and tester community, and we are continually working to improve your experience with Parallels Desktop. 

New reclaim-disk action 

You can now reclaim disk space in a shutdown VM using the prlctl Command Line Utility. To reclaim free disk space, simply execute: 

prlctl reclaim-disk <VM_name or VM_id> 

Network conditioner control 

The network conditioner is an excellent tool for users to test their applications under different network conditions and loads. We want to provide a way for this to be controlled in an automated way using prlctl.  

There are two arguments supported for prlctl set now: –network conditioner and –network-conditioner-profile. For example, to run the network conditioner, execute the command below: 

prlctl set <VM_name or VM_id> –network-conditioner on 

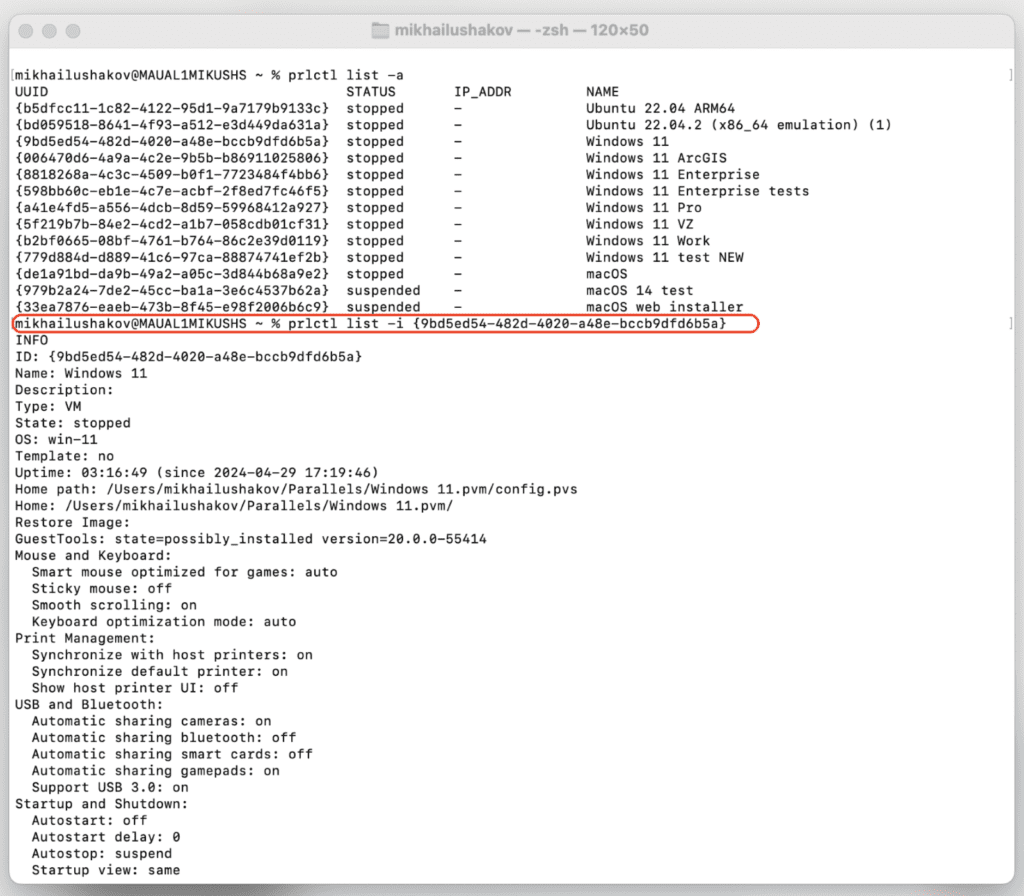
Extended output for prlctl list -i 

We’ve extended the output information of the prlctl list -i command to include the IP address of running VMs, network throttling status, and whether the VM is a clone of another VM.  

Here’s an example command: 

prlctl list -i <VM_name or VM_id> 

prlctl list -i command screenshot example

For more details, check out the Parallels Desktop developer’s guide

Bug fixes 

We’ve resolved an issue affecting our Business Edition customers. The download link in an invitation email from My Account would not activate the product with the assigned license.  We’ve restored this functionality, ensuring a smoother onboarding process for your team members. 

We’ve successfully addressed an issue in which the app windows for SolidWorks, Delphi, Grammarly, and other Windows applications running in Coherence view mode were displayed as blank windows. 

We’re committed to continuously improving Parallels Desktop and appreciate your feedback and support. We hope you enjoy these enhancements, and as always, we look forward to hearing your thoughts! You can post in our forums or make a comment on this post with your feedback.  

New to Parallels Desktop for Mac? Get your 14-day free trial of Parallels Desktop 19.4.0 now.  

The post Introducing Parallels Desktop 19.4.0! appeared first on Parallels Blog.

]]>
Kelsey Jensen <![CDATA[Join us at the Penn Mac Admins event: Empower your educational IT and DevOps teams]]> https://www.parallels.com/blogs/?p=42657 2024-06-26T16:17:07Z 2024-06-25T13:00:00Z Are you ready to streamline your workflows and boost productivity?   Look no further! Parallels® Desktop is thrilled to be part of the upcoming […]

The post Join us at the Penn Mac Admins event: Empower your educational IT and DevOps teams appeared first on Parallels Blog.

]]>
Are you ready to streamline your workflows and boost productivity?  

Look no further! Parallels® Desktop is thrilled to be part of the upcoming Penn MacAdmins event, the premier East Coast conference for anyone who deploys and manages devices in the Apple ecosystem.  

We’ll showcase our innovative solutions tailored specifically for IT administrators in educational settings and DevOps professionals. 

Why Parallels Desktop for IT admins and DevOps? 

As IT admins and DevOps professionals, you face the challenge of managing diverse computing environments and ensuring seamless operation across platforms.  

Parallels Desktop offers a comprehensive solution for integrating Windows applications into Mac environments, simplifying your tasks and enhancing your efficiency. 

What to expect at the Penn MacAdmins event 

Join us for an in-depth exploration of how Parallels Desktop can revolutionize your IT and DevOps management: 

Live demos 

Experience the power of Parallels Desktop firsthand with live demonstrations designed to showcase its robust features and seamless integration capabilities. 

Expert insights 

Gain valuable insights from our team of Parallels Desktop experts, who will share best practices, tips, and tricks for optimizing IT management in mixed-platform environments. 

Parallels Desktop workshop session 

Join us for the working session: “Virtual Machines: New in Deployment, Development, and Testing”. 

Led by Aleksandr Sursiakov, Senior Director of Product Management for Parallels Desktop, this workshop will delve into the latest advancements in using virtual machines (VMs) on Apple Silicon Mac computers for deployment, development, and testing. 

Key topics include the status and challenges of VM deployment, solutions for both Windows and macOS VMs, and practical insights for IT admins and DevOps professionals. Attendees will gain valuable knowledge on optimizing VM use to enhance efficiency and streamline workflows. 

Why IT Admins and DevOps professionals should explore Parallels Desktop 

  • Simplify management: Parallels Desktop simplifies IT management by enabling seamless integration of Windows applications into Mac environments, reducing complexity and streamlining workflows. 
  • Increase efficiency: Efficiently deploy and manage Windows applications on Mac devices, saving time and resources. 
  • Enhance security: Robust security features protect sensitive data and ensure compliance with industry regulations, providing peace of mind. 

Event details 

  • Date: July 9-12 
  • Location: Penn Star Conference Center and Hotel in State College, PA 
  • Event Website: https://macadmins.psu.edu/ 

Don’t miss this opportunity to discover how Parallels Desktop can transform IT and DevOps management within your organization.  

Join us at the Penn Mac Admins event and learn how to streamline workflows, increase efficiency, and enhance security with Parallels Desktop.  

Learn more about Parallels Desktop today.  

The post Join us at the Penn Mac Admins event: Empower your educational IT and DevOps teams appeared first on Parallels Blog.

]]>
Ian Lee <![CDATA[Leveraging virtual machines for efficient and effective software testing]]> https://www.parallels.com/blogs/?p=42638 2024-06-17T14:06:47Z 2024-06-18T13:00:00Z As we all know, software testing is vital in the software development lifecycle. It ensures that the software meets the requirements and is bug-free, and it allows developers […]

The post Leveraging virtual machines for efficient and effective software testing appeared first on Parallels Blog.

]]>
As we all know, software testing is vital in the software development lifecycle. It ensures that the software meets the requirements and is bug-free, and it allows developers to optimize performance and validate the functionality of their projects.  

However, testing can be time-consuming and resource-intensive, especially when testing software components on different operating systems and configurations. These use cases are where using virtual machines (VMs) to test software comes to the rescue. 

A VM is a software-based emulation of a physical computer that allows multiple operating systems to run on a single physical computer.  

VMs are indispensable tools for software testing, offering flexibility, scalability, and reproducibility in testing environments.  

Virtual machines also make it easier to test different configurations without affecting the host operating system. 

This guide will explore how to leverage virtual machines for efficient and effective software testing. 

Understanding the benefits of virtual machines for software testing: 

Virtual machines have become an indispensable tool for software testing. They provide a range of benefits, including isolation, reproducibility, scalability, and flexibility. 

1. Isolation  

VMs provide isolated environments for testing, allowing testers to create and test different software components and dependencies without any conflicts. This isolation is particularly important for complex software systems, where conflict between components can have severe consequences. 

2. Reproducibility 

VM snapshots allow testers to create and revert to specific states of the testing environment. This ease of replication ensures that test results are consistent and reproducible, which is essential for evaluating software quality. 

3. Scalability

A critical aspect of software testing is the ability to easily clone and deploy testing environments to enable parallel testing of multiple software configurations. This scalability helps improve testing efficiency and reduce the time and resources required for testing. It’s especially useful for large-scale projects. 

4. Flexibility

VMs like Parallels Desktop support multiple operating systems and configurations, allowing testers to simulate diverse environments and scenarios and ensure that you are testing software under a range of conditions. This flexibility is particularly important for identifying and addressing potential issues across different environments. 

Creating reproducible testing environments 

One of the significant challenges of software testing is creating a reproducible testing environment. A testing environment should be identical to the production environment, ensuring the software behaves in a similar fashion. VMs provide an easy way to create and manage reproducible testing environments. 

To create reproducible testing environments using virtual machines, follow these steps:

1. Choose a hypervisor  

To host your virtual machines, select a hypervisor such as Parallels Desktop.

2. Develop base images  

Develop base images containing the desired operating system, configuration, and software dependencies as in the production environment. 

3. Customize VM settings 

You can customize VM settings such as CPU, memory, disk space, and network configuration to match testing requirements. 

4. Install testing tools 

 Install testing frameworks, debuggers, and other tools necessary for VM tests. 

5. Take snapshots  

Take snapshots of the VM at various stages of the testing process to capture specific states for later reference or rollback. 

Following these steps, you can install the software you want to test on the VM in a controlled environment. If the software behaves differently in the testing environment, you can identify and fix the issue before deploying it to the production environment. 

Example: You’re testing a web application requiring specific web server versions, databases, and middleware. You can create a base VM image with the required software stack installed and configured. By taking snapshots before and after each iteration, you can quickly revert to a clean state and ensure consistent testing conditions. 

Utilizing snapshots for testing scenarios 

Another advantage of using VMs for software testing is the ability to take snapshots of the VM at different stages of testing.  

Snapshots are invaluable for testing scenarios where you must revert to a known state, compare different test outcomes, test different configurations, or perform multiple iterations of the same test. 

Here’s how to effectively utilize snapshots for software testing: 

1. Before-test snapshots  

Before running tests, take snapshots of the VM to capture the initial state of the testing environment. This snapshot lets you easily revert to a clean state if tests fail or produce unexpected results. 

2. After-test snapshots 

Take snapshots after completing tests to preserve the state of the environment and any changes made during testing. These post-test snapshots provide a reference point for analyzing test results and debugging issues. 

3. Branching snapshots  

Create branching snapshots to explore alternative test scenarios or configurations without affecting the primary testing environment. This step allows testers to experiment with different configurations or test cases while maintaining the integrity of the base environment. 

4. Snapshot management

Maintain a structured approach to snapshot management, including naming conventions, documentation of snapshot purposes, and regular cleanup to avoid cluttering the VM environment with unnecessary snapshots. 

Example: You’re testing a software update. Before applying the update, you can take a snapshot of the VM to capture the pre-update state.  

If something goes wrong during the update, you can quickly revert to the pre-update snapshot and investigate the issue. 

After you’ve applied the update and run your tests, you can take another snapshot to preserve the post-update state. This snapshot will help you identify any changes that occurred after the update and determine the root cause of any issues that may have arisen. 

Taking snapshots is a great way to ensure you can quickly troubleshoot and investigate any issues that may arise during software testing. They also save you time and resources, as you don’t have to recreate the entire testing environment each time you want to run a test. 

Optimizing VM configurations for testing different software components 

When testing software, you may need to test different components on different operating systems and configurations. VMs allow you to create and manage different configurations to test software components expediently. You can create a VM for each configuration, install the required software, and test the software in an isolated environment. 

To optimize VM configurations for testing different software components, you can allocate resources such as CPU, memory, and disk space based on the software’s requirements while testing against different real-world conditions with the network, such as slow clients, a drop in the internet connection, etc.  

For example, if you are testing a memory-intensive application, you can allocate more memory to the VM. If you are testing a CPU-intensive application, you can allocate more CPU resources to the VM. 

Consider the following factors when optimizing VM configurations for testing different software components: 

1. Resource allocation  

Allocate sufficient CPU, memory, and disk space to each VM to ensure optimal performance during testing. Adjust resource allocations based on the requirements of the software you’re testing and the complexity of test scenarios. 

2. Networking setup

Configure virtual networks that simulate various network conditions, such as latency, packet loss, and bandwidth constraints. This setup allows testers to evaluate software’s performance and resilience under different network conditions. 

3. Integration with testing tools  

Integrate VMs with testing tools and automation frameworks to streamline the testing process. These integrations include configuring VMs to interact with testing scripts, reporting tools, and version control systems for efficient test execution and result analysis. 

4. Environment configuration management  

Implement version control and configuration management practices to track changes to VM configurations and ensure consistency across testing environments. This capability helps avoid discrepancies between testing environments and promotes reproducibility of test results. 

Example: You’re testing a distributed system that spans multiple VMs. You can optimize VM configurations by allocating more resources to VMs hosting critical components and simulating network conditions to replicate real-world scenarios.  

Integrating VMs with testing tools like Jenkins or Selenium allows you to automate test execution and streamline the testing workflow. 

Examples of leveraging virtual machines for software testing 

Let’s look at examples of using virtual machines for software testing. 

Example 1: Testing web applications 

Testing web applications often requires checking compatibility across various configurations and browsers. Here’s how virtual machines can facilitate this process: 

Scenario: You’re developing a web application that needs to be compatible with different browsers, such as Chrome, Firefox, and Safari, as well as various operating systems, including Windows, macOS, and Linux. 

1. Create VMs for each configuration

Using a hypervisor like Parallels Desktop, create separate VMs for each browser and operating system combination you need to test. For example, you might create VMs for Chrome on Windows, Firefox on macOS, and Safari on Linux. 

2. Install the required browsers

Install the specific browser version you want to test within each VM. Ensure that you use the browser version your target users will likely use. 

3. Isolate testing environments

You create isolated testing environments by running each browser in its own VM. This isolation prevents conflicts between browser settings, extensions, or plugins that could affect the test results. 

4. Take snapshots for testing  

Take snapshots of each VM to capture its initial state prior to running tests. As you perform tests, take additional snapshots at critical stages to facilitate rollback if needed. 

5. Conduct testing 

Run your tests on each VM, performing tasks such as navigating the website, filling out forms, and testing JavaScript functionality. Testing frameworks like Selenium can automate or manually perform tests to ensure compatibility. 

6. Analyze results and debug 

After testing, analyze the results to identify any issues or inconsistencies across different browsers or operating systems. If problems arise, use your snapshots to revert VMs to a known good state for further investigation and debugging. 

7. Report and iterate

Document any issues found during testing and report them to the development team for resolution. Iterate on the testing process as needed, adjusting VM configurations or testing methodologies to improve coverage and reliability. 

Example 2: Testing cross-platform applications 

Testing mobile applications requires validation across various devices, platforms, and screen sizes. Here’s how virtual machines can facilitate mobile app testing: 

Scenario: Imagine you’re developing an application that needs to run smoothly on iOS and Android devices with different screen resolutions and device models. 

1. Create VMs for each device/OS combination 

Using tools like Android Emulator for Android or Xcode Simulator for iOS, create separate VMs for each device and operating system combination you need to test. For example, you might create VMs for iPhone X running iOS 14 and Google Pixel 4 running Android 11. 

It would look something like this: 

Create VMs for each OS Combination: Using the development tools for each of the operating systems, create separate VMs to allow running the applications and debugging them. 

2. Install the required software 

Install the necessary software components, such as the mobile operating system, development tools, and the cross-platform app, within each VM. Ensure that you use the same app version that end users will get. 

3. Simulate device environment 

You simulate real-world device environments by running each device in its own VM. This simulation allows you to test the app’s behavior on different screen sizes, resolutions, and hardware configurations. 

4. Take snapshots for testing

Before running tests, take snapshots of each VM to capture its initial state. As you perform tests, take additional snapshots at critical stages to facilitate rollback if needed. 

5. Conduct testing  

Perform a variety of tests on each VM, including functional, usability, and performance testing. Use emulators to simulate user interactions such as tapping, swiping, and rotating the device. 

6. Analyze results and debug

Analyze the test results to identify any issues or inconsistencies across different devices or operating systems. If problems arise, use the snapshots to revert VMs to a known good state for further investigation and debugging. 

7. Report and iterate 

Document any issues found during testing and report them to the development team for resolution. Iterate on the testing process as needed, adjusting VM configurations or testing methodologies to improve coverage and reliability. 

Example 3: Testing database applications 

Testing database applications involves validating data integrity, performance, and scalability across different database systems and configurations. Here’s how virtual machines can support this type of testing: 

Scenario: Consider you’re developing a database application that needs to support multiple database management systems (DBMS), such as MySQL, PostgreSQL, and Microsoft SQL Server, across different operating systems. 

1. Create VMs for each DBMS 

Using a hypervisor, create separate VMs for each DBMS and operating system combination you need to test. For example, you might create VMs for MySQL on Ubuntu, PostgreSQL on CentOS, and SQL Server on Windows Server. 

2. Install the required database software

Within each VM, install the specific DBMS version you want to test and any additional tools or utilities required. Ensure you use the same database version and configurations as your production environment. 

3. Configure test datasets 

Populate each database with test data representing various use cases and scenarios. This example data allows you to evaluate data manipulation, querying performance, and transactional integrity. 

4. Take snapshots for testing  

Take snapshots of each VM to capture the initial state before running tests. As you perform tests, take additional snapshots at critical stages to facilitate rollback if needed. 

5. Conduct testing 

Perform a range of tests on each VM, including functional testing, performance testing, and scalability testing. Execute SQL queries, analyze query execution plans, and monitor database performance metrics. 

6. Analyze results and debug  

Analyze the test results to identify issues or performance bottlenecks across different DBMS or configurations. If problems arise, use the snapshots to revert VMs to a known good state for further investigation and debugging. 

7. Report and iterate

Document any issues found during testing and report them to the development team for resolution. Iterate on the testing process as needed, adjusting VM configurations or testing methodologies to improve coverage and reliability. 

See how testing on virtual machines can improve your organization’s processes 

In conclusion, virtual machines provide a reproducible and isolated environment for testing software, making it easier to test different configurations without affecting the host operating system.  

By following best practices such as creating reproducible testing environments, utilizing snapshots for testing scenarios, and optimizing VM configurations, organizations can streamline their testing processes, improve test coverage, and continuously improve software quality and reliability. 

Ready to start testing? Sign up for a free 14-day trial of Parallels Desktop to see how it can help improve your testing workflow.  

The post Leveraging virtual machines for efficient and effective software testing appeared first on Parallels Blog.

]]>
Ary Collet Junior <![CDATA[How to unzip files on a Mac quickly]]> https://www.parallels.com/blogs/?p=42622 2024-06-17T17:43:30Z 2024-06-17T13:00:00Z A zipped file is a file that has been reduced in size using a file compression algorithm.   The primary purpose of zipping files is to make them smaller, sending them via email […]

The post How to unzip files on a Mac quickly appeared first on Parallels Blog.

]]>
A zipped file is a file that has been reduced in size using a file compression algorithm.  

The primary purpose of zipping files is to make them smaller, sending them via email or other file transfer methods faster and easier.  

By compressing the data, zip files save bandwidth and shorten download and upload times. 

Imagine the difference in size if you mail a box of books that are all jumbled versus a well-organized box where each book is stacked carefully and fitted to the books next to it.  

The books don’t lose pages or physically get smaller, but organizing them means they’ll fit in a smaller box.   

However, once a file has been zipped, it must be unzipped to see the contents. While that sounds complicated, it’s a simple process.  

Switch seamlessly between Mac and Windows with Parallels Desktop. Try it free for 14 days.   

How to unzip files on Mac with Parallels Desktop 

Unzipping files is a skill every modern internet user needs to master.  

Whether you’re sharing photos from a recent trip with friends or downloading anti-virus software, zipped files are part of everyday internet life.  

Luckily, unzipping files on a Mac is relatively simple:  

1. Double-click on the zip file folder 

When a zipped file arrives in your inbox or download folder, double-click the file.  

2. The file will automatically decompress   

The unzipped file will appear in the same folder where the zipped version was stored. You can choose to keep or delete the zipped version to save space.   

3. Click to view your files   

Once the files have been unzipped on your Mac, you can view and read each file as usual. If you need to rezip the file, right-click the folder and choose “Compress <folder name>” from the  

pop-up menu.  

Compressing and Uncompressing Files on a Mac 

While you might tend to think of the terms “zip” and “unzip” when you need to make files smaller, macOS uses the term “Compress”.  

If you have a Parallels Desktop Pro subscription, you have access to Parallels Toolbox, which offers the Archive and Unarchive tools for compressing and uncompressing files.  

FAQ: Having trouble unzipping files on a Mac? 

Zipping and unzipping files on a Mac is a relatively simple process once you get the hang of it. If you run into issues or have additional questions, these frequently asked questions may help.   

Does Mac automatically unzip files?  

No, your Mac will not automatically unzip files — unless you are running Safari. If you click on a zipped file in the Safari browser, the file is downloaded, and you’ll find it uncompressed in the download folder.  

If you are running other browsers (e.g., Chrome or Firefox), you must double-click the file to unzip a zip file. Select Preferences > General > then unselect the Open “safe” files after downloading option.   

Why can’t I unzip a file on my Mac? 

There can be several reasons why a file won’t unzip on your Mac. The most common cause is a lack of space on your computer, which can be fixed by using Finder to locate and delete large, old, and unused files from your computer.  

Another common issue is corrupted files. Try re-downloading the file and unzipping it again. If the issue persists, contact the sender and request a new file.  

Ensure your OS is the latest version (if not, make any necessary updates) and verify your permission to unzip files, especially if you’re using a shared or work device.  

Finally, make sure the zipped file does not require a password. Zipped files that are password protected will not unzip without the correct password.  

How do I unzip a corrupted zip file on a Mac? 

In most cases, you cannot unzip a corrupted file on a Mac. However, there are a few troubleshooting steps that may help:  

  • Try re-downloading the file. Sometimes, the file is corrupted during the download process.  
  • Ask the sender to rezip and resend the file. If corruption occurred during the zipping process, this may resolve the issue.  
  • Use a program like WinZip, which may allow you to extract some of the files.   

Unzip Mac files with ease!  

Learning how to unzip files is essential for accessing a wide range of digital content, from software downloads to large documents. The straightforward steps we shared will ensure you can unzip files in seconds.  

Switch seamlessly between Mac and Windows with Parallels Desktop. Try it free for 14 days.   

The post How to unzip files on a Mac quickly appeared first on Parallels Blog.

]]>
Kelsey Jensen <![CDATA[How to play Minecraft on a Mac]]> https://www.parallels.com/blogs/?p=42626 2024-07-17T19:53:28Z 2024-06-14T13:00:00Z Minecraft is this gaming generation’s Tetris.   It’s simple in design philosophy and art style—albeit with an incredible and nearly limitless well of depth.   It’s the top-selling game of all time, with over 300 […]

The post How to play Minecraft on a Mac appeared first on Parallels Blog.

]]>
Minecraft is this gaming generation’s Tetris.  

It’s simple in design philosophy and art style—albeit with an incredible and nearly limitless well of depth.  

It’s the top-selling game of all time, with over 300 million sales. An insane 140 million users are active monthly. 

Despite expanding to consoles and mobile devices, many Mac gamers have felt left behind.  

However, with Parallels Desktop Pro, you can experience the entire Minecraft game on Mac in all its glory.  

Here’s how you can make it happen and live through your first treacherous night.  

Mac owners with Apple’s recent and hyper-powerful processors—M1, M2, and M3—will likely get seamless performance out of this Minecraft on their Mac.  

Other requirements include: 

Compatible Versions of Mac OS  

  • macOS Sonoma 
  • macOS Ventura 
  • macOS Monterey 
  • macOS Big Sur 
  • macOS Catalina 
  • macOS Mojave 

Processor Type 

  • Apple M-series chips 
  • Intel Core i5, Core i7, Core i9 or Xeon processor 

Recommended Memory Capacity 

  • 16 GB of RAM or more 

Storage Space 

  • 600 MB (for installing Parallels) 
  • 16 GB (for Windows 11) 

Graphics Chips 

  • Graphic processors M-series Macs 
  • AMD Radeon Pro graphics cards 

Download Parallels Desktop Pro to play Minecraft on your Mac 

First, download Parallels Desktop for Mac. (There’s a free 14-day trial for uncertain gamers.)  

I recommend the Pro Edition for the best gaming performance.  

After providing your email, you’ll arrive at a download page. Click Download Parallels Desktop, then the link that was just sent to your address.  

1. Install Parallels Desktop on your Mac’s hard drive 

Double-click your newly downloaded .dmg executable. A pop-up window with the Parallels icon will appear. Double-click it or click Open if you’re first presented with a confirmation window.  

Click through the user agreement, and watch Parallels Desktop download and install itself. 

2. Download and install Windows 11 with Parallels Desktop 

While Parallels Desktop allows you to play PC games on your Mac, you still need Windows to do so. Thankfully, the installer makes it quick and painless. *  

Choose Windows 11 on the operating system selection screen. Parallels Desktop will automatically download and install the operating system.  

Once done, you’ll see a finder window containing a complete installation of Windows 11.  

3. Adjust virtual machine settings on Pro 

Access the Parallels Desktop Control Center and navigate to the “Hardware” section.   

If you are using Parallels Desktop Pro editions, you can adjust the virtual machine settings by allocating an adequate amount of RAM, CPU, and GPU resources to ensure an efficient gaming experience.  

You can accomplish this by enabling the Gaming Profile.   

When it is enabled, Parallels Desktop provides more RAM and CPU to Windows, enters full-screen view for greater immersion, and toggles the mouse mode for better compatibility with games.   

To enable the Gaming Profile:  

1. Shut down Windows via the Start menu and open its configuration  

2. Click “Change” and select “Games only”.   

3. Now close the configuration menu and start Windows.  

4. Optimize Parallels Desktop for gaming    

By enabling “Optimize for games” in your virtual machine profile, you can further enhance your gaming experience and ensure smoother gameplay within the virtual machine.   

Note that if you’re using Parallels Desktop Standard Edition, you can choose from Productivity mode or “Games only” mode.   

With the Pro version of Parallels Desktop, you have more options.   

5. Sign up for a Microsoft account to play Minecraft on your Mac 

Minecraft, like other hugely popular live-service games—Valiant, Diablo 4, and Fortnite—requires a separate launcher. 

Visit Minecraft’s login page to begin signup. Unless you already have a Microsoft account, click Create Profile.  

Enter your location, email, and birthdate. Check your email for the confirmation code. 

You’ll now need a Gamertag. If you can’t think of one, choose one of the four automatically generated names. 

Click Let’s Go, and you’ll be logged in!  

6. Purchase Minecraft and download the launcher 

You can either purchase Minecraft through Minecraft’s official site or through Microsoft’s digital storefront. It costs $29.99 either way. 

Click Buy on the Microsoft store or Checkout on the official site. Complete the purchase and download Minecraft’s launcher. 

7. Decide — Minecraft Java or Minecraft Bedrock Edition? 

After your launcher pops up, you’ll be prompted to choose between installing Minecraft Java Edition and Minecraft Bedrock Edition.  

Which one should you choose? 

The two versions have hundreds of differences, most of which are technical and relatively small. A few are worth considering before making your choice: 

Minecraft: Bedrock Edition 

  • More streamlined 
  • More user-friendly 
  • Runs better on hardware 
  • You can cross-play with users’ consoles, mobile, and computer gamers 

Minecraft Java Edition 

  • Best for tinkerers and thrill seekers 
  • Has an endless library of popular mods and servers 
  • You can only play with others on computers 

While many hardcore Minecrafters stake their lives on one version’s superiority, you’ll have a great experience either way. 

8. Download your chosen version and begin your journey with Minecraft on your Mac 

Press play after downloading your chosen version.  

Next, choose between an offline solo journey or mixing it up on a multiplayer server.  

While multiplayer is worthwhile, its complexity can be overwhelming, especially if you’re learning the game’s rules.  

Pick offline unless you’re ready for the deep end. 

How to play your newly Mac-compatible Minecraft 

Minecraft is known most for its sense of freedom as a childhood Lego play session coming to life.  

Minecraft is not just a cute crafting game, though. At its core, Minecraft is a survival game. Like the Australian outback, there’s an endless array of creatures and environments out to kill you/rain on your parade. Survival becomes far easier.  

The penalty for death is pretty light. You’ll drop all your items on the ground, which you can pick up again after a respawn (So long as you do so within five minutes).  

Here’s how you tackle the game without getting bodychecked by things that go bump in the night.  

In Minecraft, you’ll have to fight (and build) to survive 

Light is a precious resource in Minecraft. A day passes in ten minutes, after which virtual mobs of nasty enemies will spawn around you. You’ll have to avoid, battle, or trap them to survive. 

On your first day, you should get the following done: 

  1. Chop down trees for survival resources 
  1. Create a crafting table with dismembered trees 
  1. Make a pickaxe and scout for rocks 
  1. Find a hillside for your first shelter 
  1. Protect your shelter from monsters by crafting torches 

Let’s go through each of these in more detail.

1. Chop down trees for survival resources 

Find your nearest tree and begin assaulting it with your fists. Because your fists lack fury, it’ll take 15 strikes for one block.  

You’ll need at least ten for your first day, more if you plan to build your initial structure with wood. 

Pick the wood blocks off the ground and destroy leaf blocks for a chance to get apples (Every action consumes hunger, and you’ll die if you starve). 

2. Create a crafting table with dismembered trees 

Go into your crafting menu and place one log in the center of your 3×3 crafting grid.  

You’ll get four wooden planks, a resource you’ll need extensively, especially in the early game. Place four blocks in the lower left-hand corner of your crafting grid to create a crafting table.  

3. Make a pickaxe and scout for rocks 

With a crafting block, we can build tools we’ll need to extract resources. We’ll need a pickaxe to mine a few stones. 

Set the crafting table on the ground and right-click. Place two wooden planks in the grid’s center and one below. You’ll get four sticks. Get four more. 

We’re done crafting for now. Scout out your environment to find a rock outcropping or mountain. Take out your axe and pick off eight cobblestones (or blackstones).  

4. Find a hillside for your first official Minecraft shelter 

Finally, you’ll need a structure to keep you safe. Rather than building your own, it’s easiest to carve out a little space on the side of a hill or mountain.  

Once you find the right spot, dig into it. Carve out a hole at least two blocks tall, three blocks wide, and three blocks deep.  

5. Gain monster protection and craft a furnace, torches and a door 

Finishing your humble home means employing torches and a door to ward off monsters.  

Place your crafting table on the ground and use it to create a furnace. Fill every square with rock blocks except the center. Set your furnace on the ground next to your crafting table.  

Right-click the furnace and smelt one wood block. You’ll now have one charcoal block. Open the crafting table again, place charcoal in the center and a stick below it. Now you’ve created your first light source!  

Finally, craft a door. Arrange six wood planks on the leftmost two columns using the crafting block. Place your door and torches and breathe a sigh of relief. Now, you can wait for your second morning in peace.  

Once morning comes, you’re free to begin your journey in full. Find further guidance with Minecraft’s excellent tutorials (keep this crafting guide handy, too).  

There are thousands of ways to enjoy Minecraft on your Mac 

It’s hard to understate just how much one can do, or participate in, with Minecraft. Unlimited offline inventions and adventures, limitless ways to thrive and play alongside others; all rising in quantity day after day, as hundreds of millions shape a universe of hand-sculpted worlds. 

Go ahead, make Minecraft your own. Start your adventure with Parallels Desktop Pro! 

*Note that you’ll need to purchase a Windows license if you don’t already have one. 

The post How to play Minecraft on a Mac appeared first on Parallels Blog.

]]>
Ary Collet Junior <![CDATA[Preview macOS Sequoia 15 with Parallels Desktop – The Ultimate Convenience for Tech Enthusiasts and Developers!]]> https://www.parallels.com/blogs/?p=42611 2024-07-19T16:25:12Z 2024-06-11T14:55:14Z Following Apple’s WWDC ’24 conference, excitement is in the air, where the spotlight shone brightly on macOS Sequoia 15.   As […]

The post Preview macOS Sequoia 15 with Parallels Desktop – The Ultimate Convenience for Tech Enthusiasts and Developers! appeared first on Parallels Blog.

]]>
Following Apple’s WWDC ’24 conference, excitement is in the air, where the spotlight shone brightly on macOS Sequoia 15.  

As tech enthusiasts and developers, we’re all eager to get our hands on the latest features and innovations.  

However, upgrading your entire Mac to the beta version might not be the most practical approach, especially when you want to stabilize your primary environment.  

Thankfully, Parallels Desktop offers the most convenient way to preview macOS Sequoia 15 in a virtual machine.  

You can explore the latest macOS in a safe, isolated environment without altering your primary system.  

Plus, we’re thrilled to offer a free 14-day trial of Parallels Desktop, with no commitment required. 

Here’s a step-by-step guide to help you get started with macOS Sequoia 15 on Parallels Desktop. 

Install macOS Sequoia 15 in a Virtual Machine 

Note: your Apple ID must be a member of the Apple Developer Program to proceed. 

1. Download, unzip, and install the latest Xcode beta tools 

   – Head over to the Apple Developer Downloads page to get the latest Xcode beta tools. 

*Note: Install MobileDevice.pkg manually (navigate to Xcode-beta.app/Contents/Resources/Packages and install MobileDevice.pkg).

2. Download the macOS 15 beta restore image 

   – Visit the Operating Systems Downloads page and download the macOS 15 beta restore image. 

3. Create a new macOS VM in Parallels Desktop 

   – Open Parallels Desktop. 

   – Click File > New

   – Select Install Windows, Linux, or macOS from an image file, then click Continue

   – Choose the downloaded macOS 15 beta image file and click Continue

   – Set your desired name for the VM and click Create

4. Wait for the installation to complete 

   – Parallels Desktop will guide you through the macOS installation process. This may take some time, so be patient as your new virtual machine is set up

5. Complete the macOS setup 

   – Once the installation is complete, follow the on-screen instructions to set up a new user account in macOS Sequoia 15. 

6. Install Parallels Tools 

   – On the menu bar, click on the virtual machine name > Install Parallels Tools

   – When the installation is complete, restart macOS 15. Parallels Tools bring clipboard synchronization and file sharing between your primary macOS and the virtual machine. 

Important limitations to note 

– Signing into an Apple ID in a virtual machine is not supported: you won’t be able to sign into your Apple ID within the VM. 

– If you have an active VPN connection on the primary macOS, the virtual machine may lose network access. If this happens, shutdown the VM > open the VM configuration > Hardware > Network > Source: > switch to the Bridged network mode. 

– Snapshots are not available yet for macOS virtual machines on Apple silicon. 

Discover the latest innovations in macOS Sequoia 15  

With Parallels Desktop, you can seamlessly explore macOS Sequoia 15 and stay ahead of the curve.  

Our virtual machine software provides the flexibility and power you need to test new features without compromising your main operating system.  

Don’t wait—download your free 14-day trial of Parallels Desktop today and dive into the future of macOS! 

Happy exploring! 

The Parallels Desktop Team 

Try Parallels Desktop Free for 14 Days 

Disclaimer: Features and steps mentioned are subject to updates and changes as software evolves. 

The post Preview macOS Sequoia 15 with Parallels Desktop – The Ultimate Convenience for Tech Enthusiasts and Developers! appeared first on Parallels Blog.

]]>